Getting Started with Scrible in Canvas

Scrible’s Canvas integration is available for educators using a non-trial version of Scrible Edu Pro.
We’ve made exciting updates to our Canvas integrations! Canvas users can now create, edit, and distribute assignments for Scrible entirely within Canvas, making it easier to manage assignments and student work. Also, new classes added to Scrible now automatically pull in sections, which make it easier to distribute assignments created in Scrible. Follow the step-by-step instructions below to create and configure a Scrible assignment in Canvas.
Canvas Administrators
To set up the Canvas/Scrible integration, follow these steps:
Follow the Launch Canvas LTI 1.3 wizard to set up Scrible's integration within Canvas.
After the baseline setup of the LTI integration, choose from either a global install, installing within specified sub-accounts, or allowing teachers to perform the installation themselves.
We encourage either the global install or installing in specific sub-accounts to prevent teachers from spending additional time installing an LTI app. However, we do have a wizard to help with that as well!
Existing installations: If you installed the Scrible integration prior to our assignment and section integrations (released in Feb 2025), please follow these instructions to update your installation and enable these new features.
Educators
Accessing Scrible in Canvas
Once your administrator has set up the Canvas integration, Scrible should be available within your Canvas course. To open Scrible:
Open your desired Canvas course.
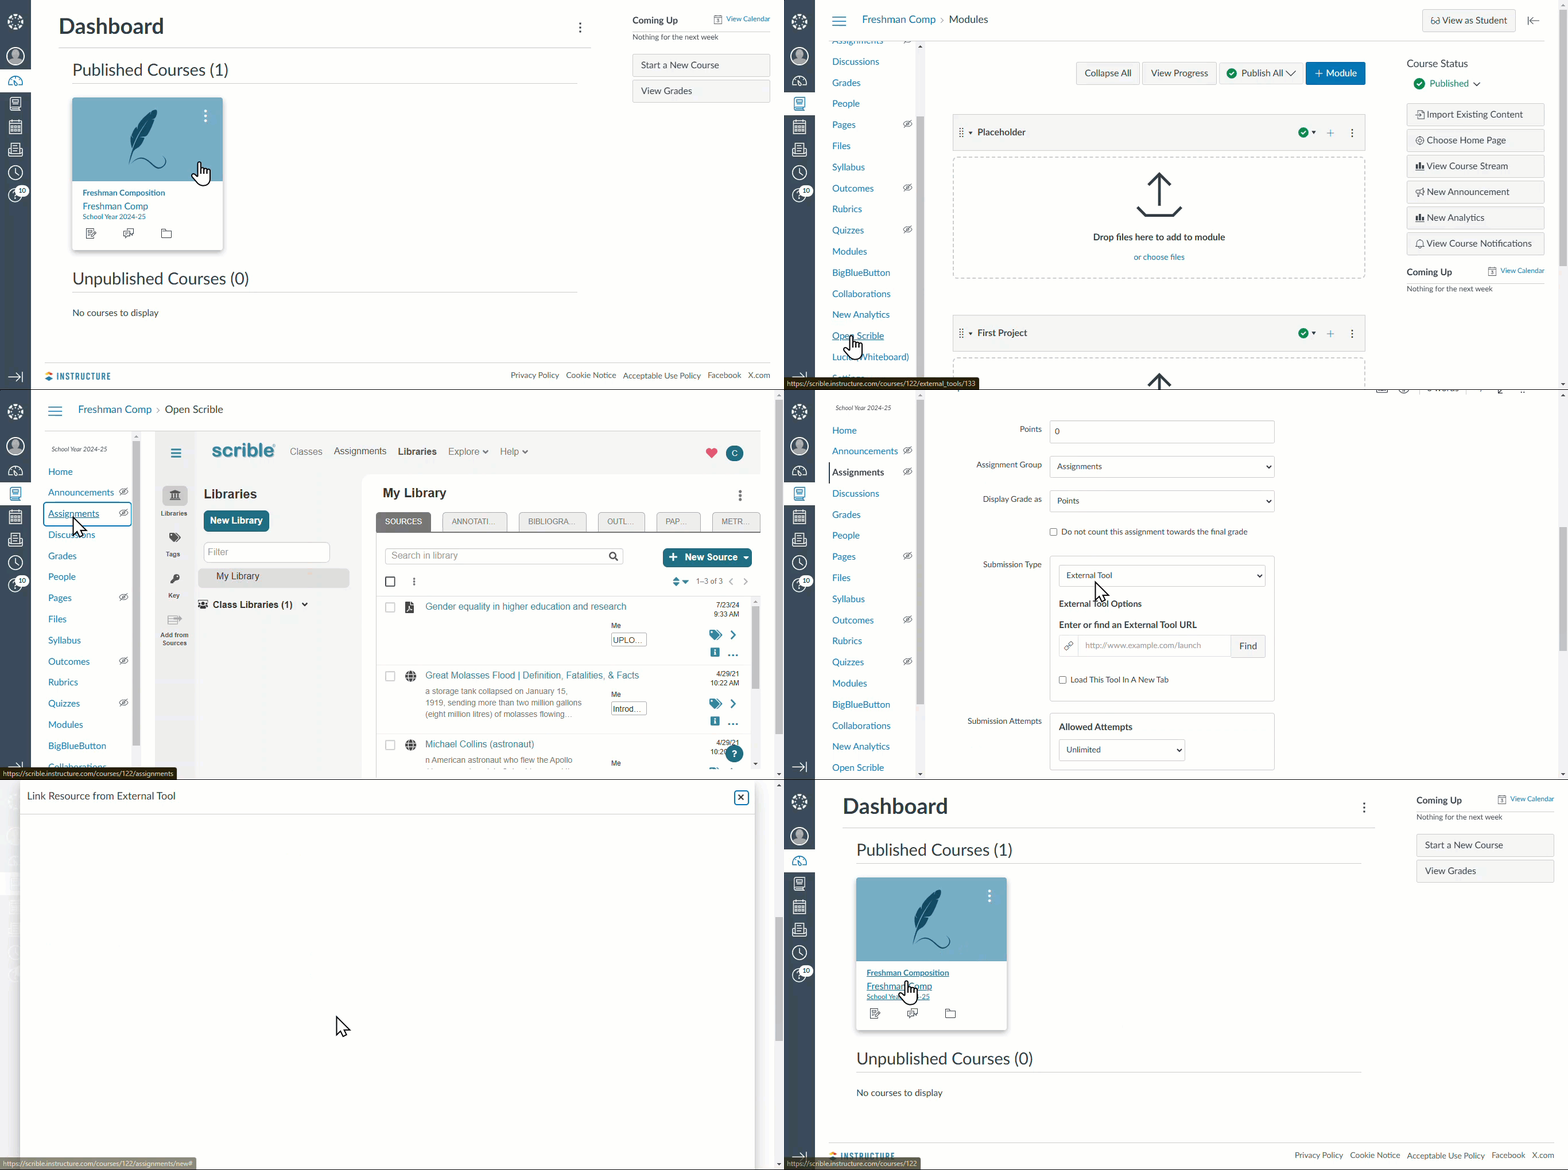
From the left panel, click Open Scrible. If you do not see this as an option, please use this wizard to add Scrible to your course.
If you are new to Scrible, you will be prompted to configure and create your account. Follow the steps. You only need to answer these questions once.
This will launch Scrible directly in Canvas, where you can:
Access your Scrible Library to organize and annotate research sources.
Use Scrible’s writing tools to streamline the research and writing process.
View and work on Scrible Assignments.
Now, let’s walk through how to create a Scrible assignment in Canvas.
Creating a Scrible Assignment in Canvas
Step 1: Access Scrible in Canvas
- Open your desired Canvas course.
- From the left panel, click Open Scrible.
- In the same panel, navigate to the Assignments tab.
- In the main window, click the + Assignment button.
Step 2: Configure the External Tool
- Scroll past the Canvas Title and Description fields, and go directly to the Submission Type section. This is important – please do NOT add any text in the Title or Description fields!
- Click the down arrow to open the drop-down menu, then select Find.
- Choose Scrible Assignment from the list.
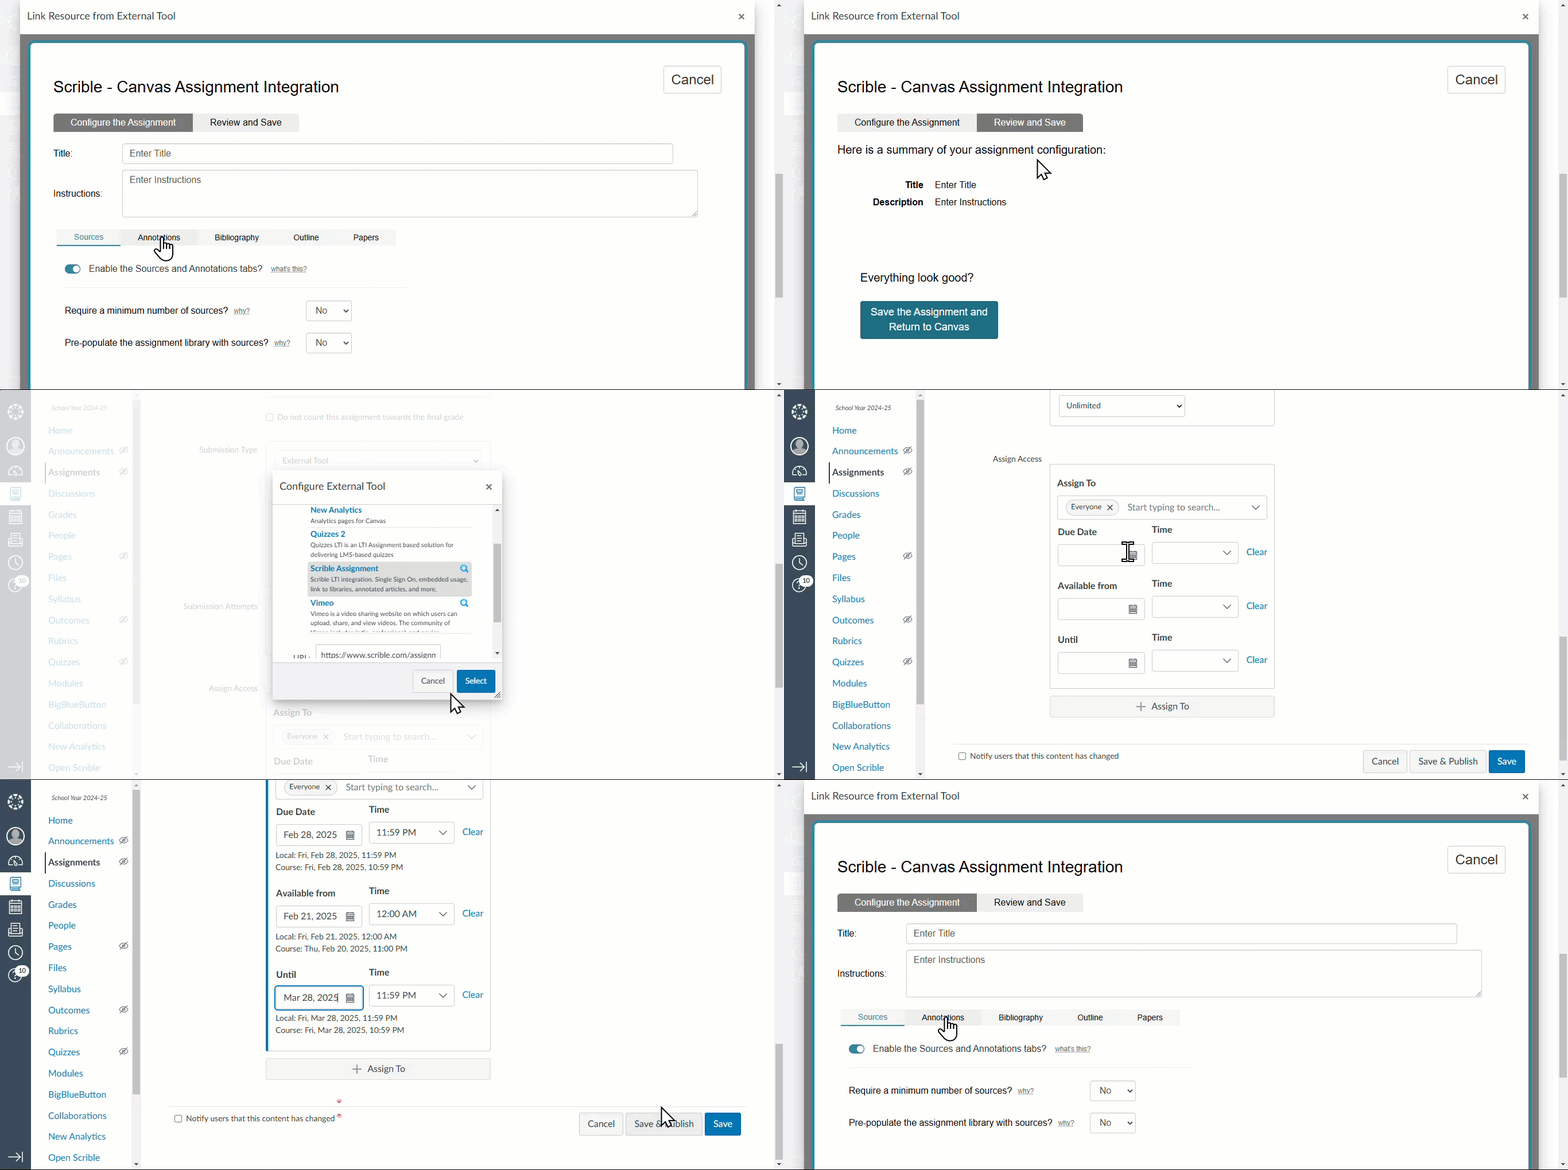
- In the new window, select an assignment option, then click Continue.
You will be prompted with two options: “I want to create an assignment from scratch” or "I want to create an assignment from an existing assignment.”
If you are creating a brand new assignment, click the first option. If you are copying an existing Scrible assignment to assign to another section, click the second option.
🎥 See the GIF below for a visual walkthrough of these steps.

Step 3: Configure the Assignment
Enter the assignment title and instructions under the Configure Assignment tab.
Use the subordinate tabs (e.g. Sources, Annotations, etc.) to add additional requirements. See this article for more details.
Once everything is configured, click on the Review and Save tab.
Click Save the Assignment and Return to Canvas.
NOTE: you will see the title and description but not the requirements you have programmed on this page. Don’t worry! They are all still there and can be viewed later.
Step 4: Distribute the Assignment
Confirm that Scrible Assignment is still selected in the Configure External Tool popup, then click Select.
Scroll to Assign Access to set distribution options and due dates. Please see important notes below before finalizing this step.
Click Save & Publish to publish and distribute the assignment.
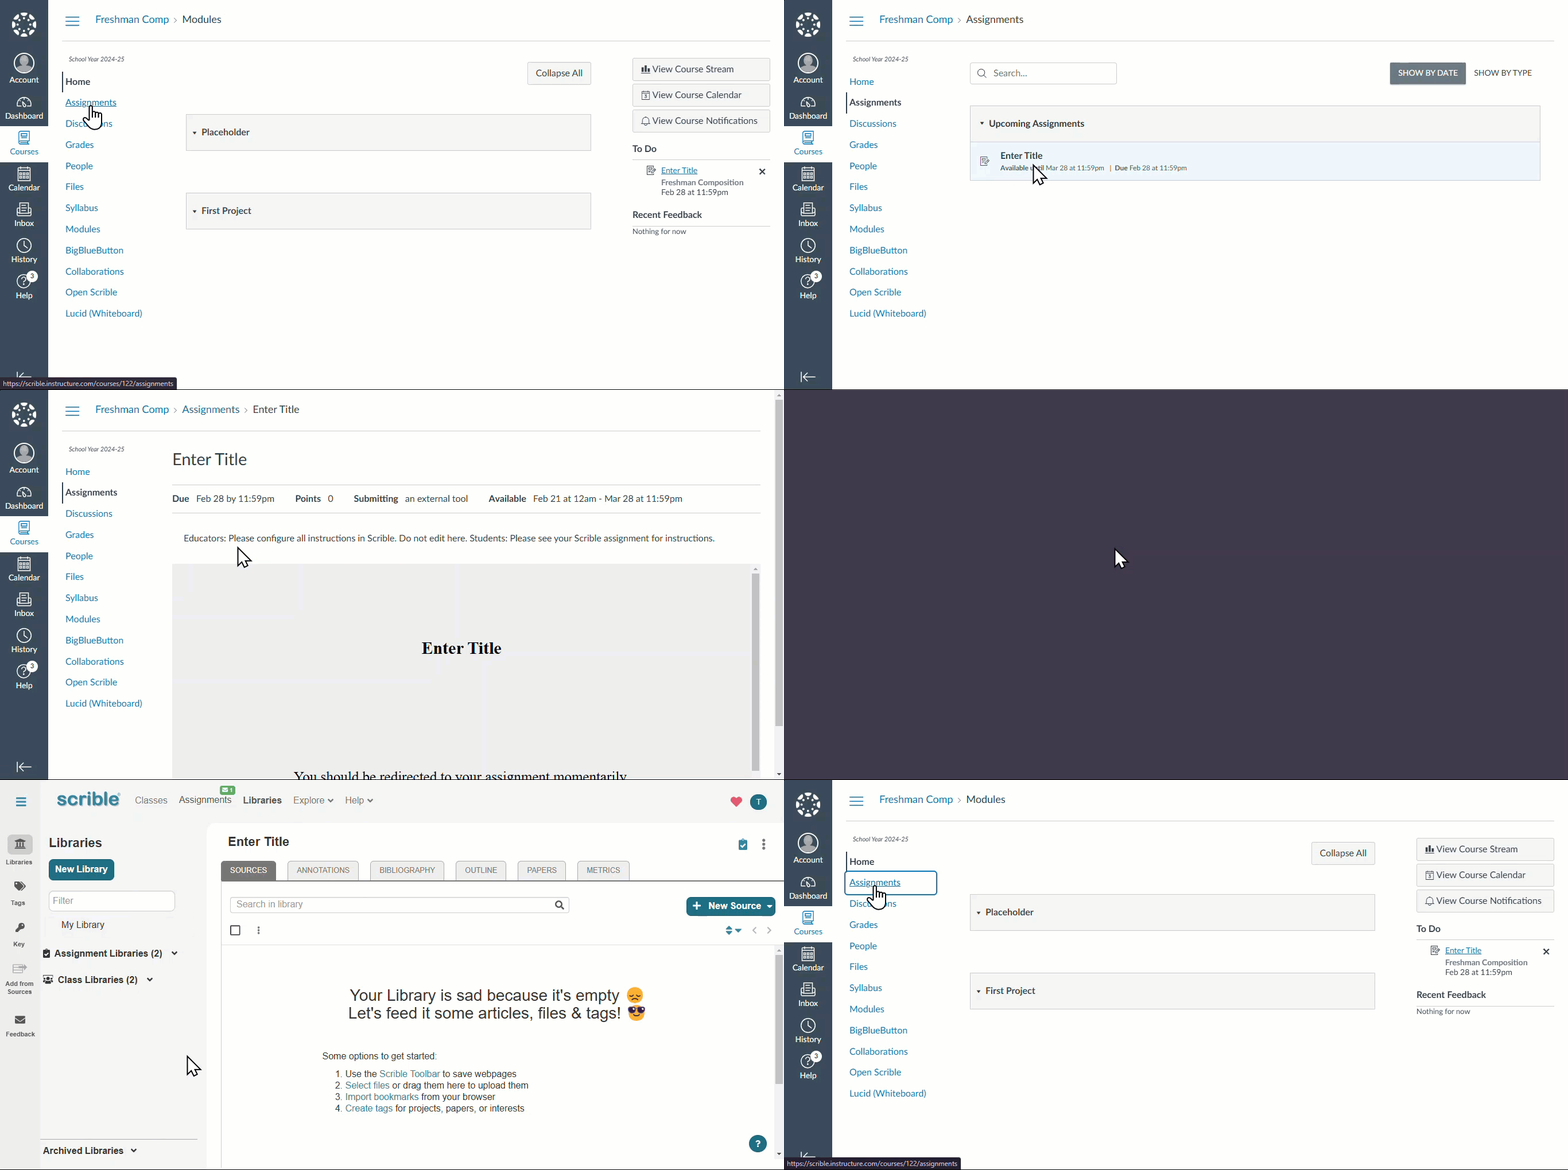
Once successfully created, you’ll land on the Overview page.
IMPORTANT NOTES REGARDING STEP 2:
Scrible only supports one set of due dates per assignment. So, we do not recommend clicking on the additional “Assign to” button at the bottom and choosing another section and adding a different due date there.
If you choose “Everyone” or multiple sections in the “Assign to” field then all of your students will be in ONE assignment in Scrible. Your analytics charts in Scrible will have students from all sections in them. If you are ok with this, then you are all set!
OUR RECOMMENDED PATH IF YOU HAVE MULTIPLE SECTIONS AND/OR MULTIPLE DUE DATES FOR THE SAME ASSIGNMENT:
In the “Assign To” field, add ONE section of your course.
Save & Publish the assignment.
Go back to the “+Assignment” button and choose the option of “I want to create an assignment from an existing assignment.”
In the “Assign to” field add the NEXT section of your course. Rinse. Repeat.
🎥 See the next GIF for additional setup details.

How Students Access the Assignment
- In the student view of Canvas, go to Assignments from the left panel.
- Click the name of the Scrible Assignment to open it.
- Click Your Assignment Library to launch Scrible within Canvas.
🎥 Check out the GIF below to see how students interact with Scrible assignments.

