
Creating an Assignment
Scrible offers two ways to create assignments: Assignment Quick Start for fast setup using pre-configured templates, or Custom Assignment for full control over every setting. This guide covers both methods.
Assignments is an Edu Pro only feature.
Assignment Quick Start
Assignment Quick Start lets you create an assignment from a pre-configured template. Select a template, add a name and due date, and your assignment is ready.
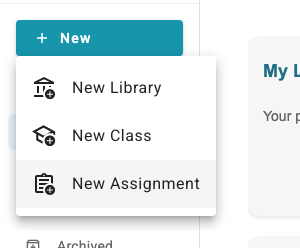
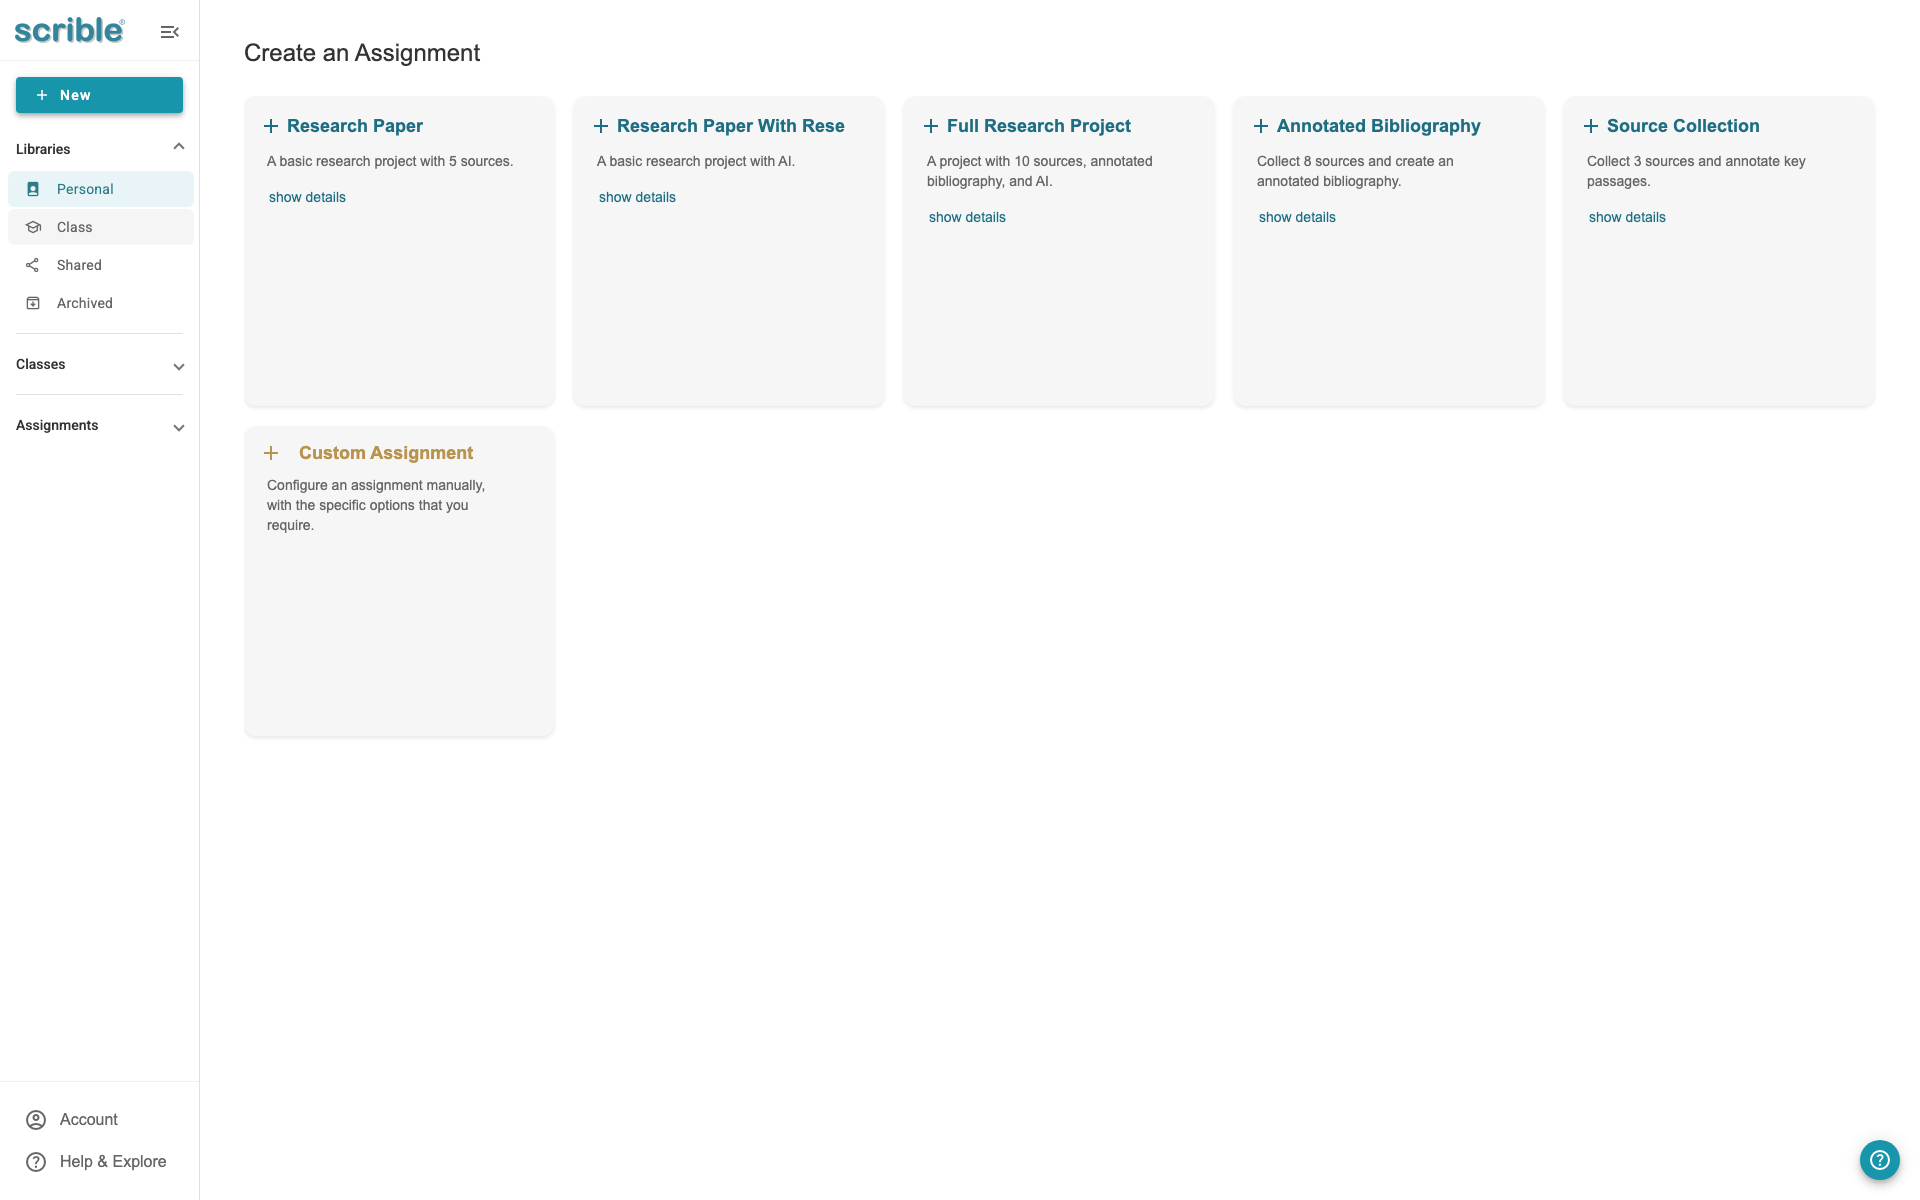
To get started, click the New button in the left sidebar and select New Assignment. You’ll see the template selection screen.
Available Templates
Research Paper - A basic research project with 5 sources, bibliography, and documents
Research Paper With Rese - A research project with AI assistance enabled
Full Research Project - A comprehensive project with 10 sources, annotated bibliography, and AI
Annotated Bibliography - Collect 8 sources and create an annotated bibliography
Source Collection - A simple assignment to collect 3 sources
Click show details on any template to see its full configuration.
Creating a Quick Start Assignment
Click a template card to select it
Enter an Assignment Title and adjust the Due Date if needed
Click Create Assignment
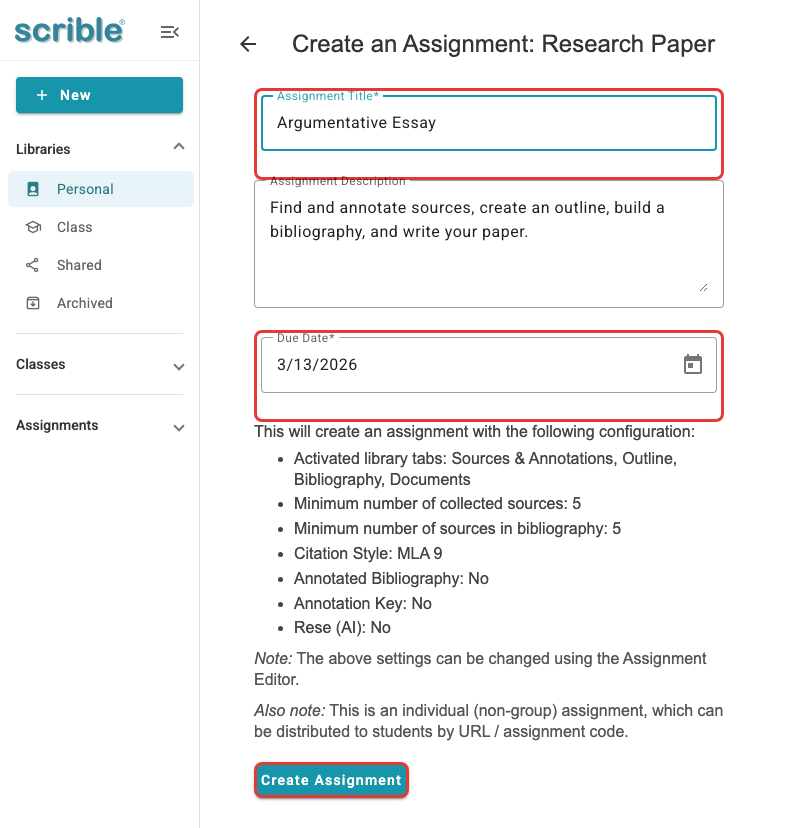
The form shows exactly what settings the template includes. Your assignment is created immediately when you click Create Assignment.
Editing Quick Start Assignments
After creating a Quick Start assignment, you can edit any setting using the Assignment Editor. Quick Start gets you started fast, but you still have full control to customize settings later if needed.
Creating a Custom Assignment
For full control over every setting, click the New button in the left sidebar, select New Assignment, and then click Custom Assignment from the template selection screen.
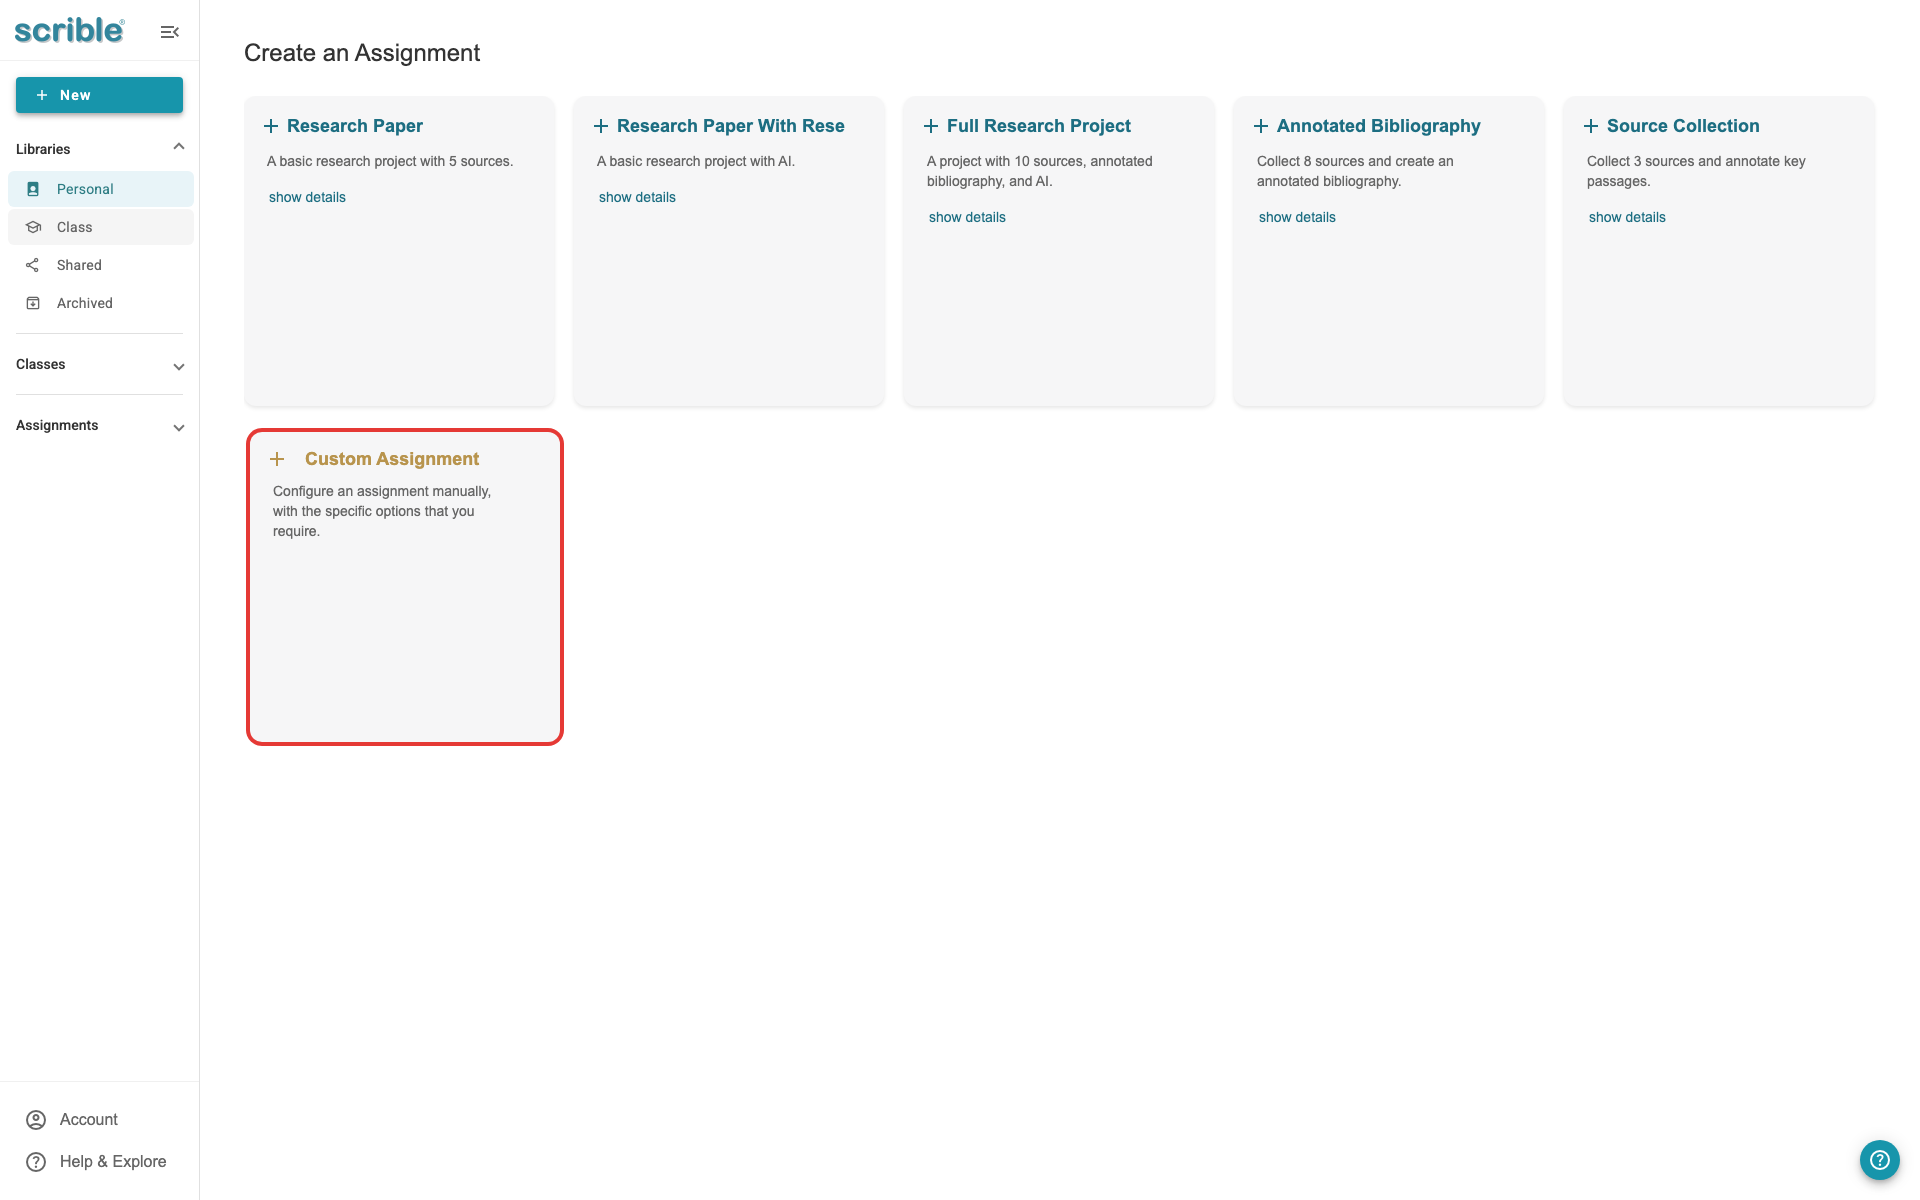
This opens the assignment creation wizard with full access to all settings.
The creation wizard guides you through five main steps:
Basics - Set assignment name, description, and dates
Library Setup & Requirements - Configure library features, requirements, and research tools
Distribution - Choose how students access the assignment
Co-Teaching - Add co-instructors (optional)
Review - Confirm all settings before finalizing
Setting Assignment Basics
The first step collects essential information about your assignment.
Assignment Title (required): Give your assignment a clear, descriptive name that students will recognize.
Description (optional): Add instructions, context, or objectives for the assignment. While optional, a description helps students understand what you expect.
Due Date: Set when students should complete the assignment. This is the target completion date that appears in student dashboards.
Close Date: Set when the assignment closes and no longer accepts submissions. The close date should be after the due date to allow late submissions. For example, if the due date is Friday, you might set the close date for the following Monday to give students a few extra days, or to allow for students who were absent.
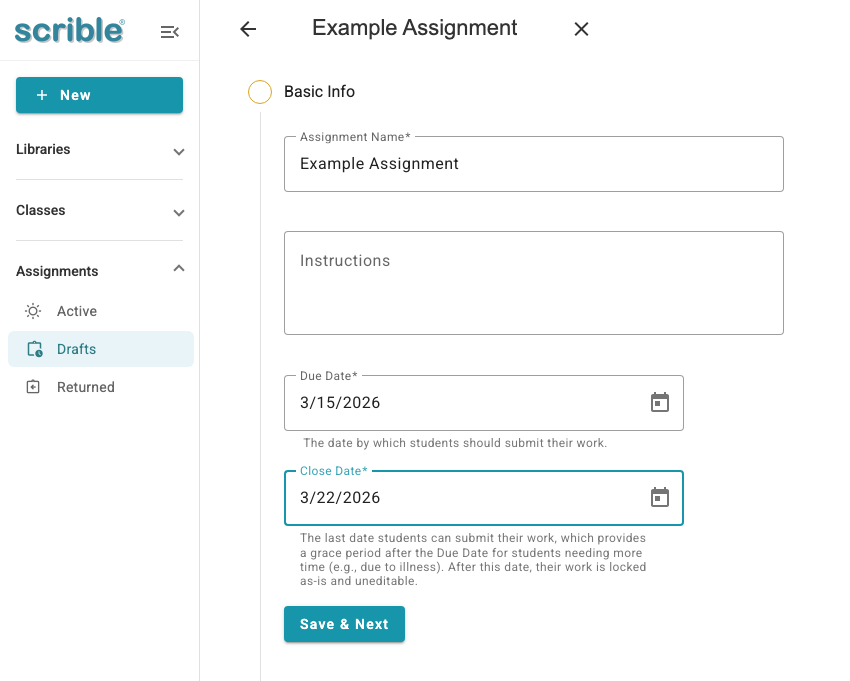
For more details about how these dates work and their impact on student submissions, see Understanding Due Dates and Close Dates below.
Configuring Library Setup and Requirements
The Library Setup step lets you enable and configure different research tools for your assignment. All sections are disabled by default - enable only the features you need for your assignment and set requirements for those features.

Sources & Annotations
Enable Sources and Annotations: Toggle this on to give students access to the Sources and Annotations tabs in their library, allowing them to collect and annotate sources.
Requirement: Minimum number of sources: Set a minimum number of sources students must add to their library. This ensures students gather sufficient research materials before moving forward.
Populate the assignment library with sources: Add sources from your existing Scrible libraries to pre-populate each student's assignment library. These sources will appear automatically in every student's library when they access the assignment, giving them a starting point for their research.
Create an Annotation Key: Enable annotation keys to automatically tag student annotations as they create them. Annotation keys create preset associations between annotation types (like highlight colors) and tags. Students can use categories like "Evidence" (green highlight), "Counterargument" (red highlight), or "Claim" (blue highlight) without manual tag entry.
This provides guardrails: all students use the same highlights and tags, ensuring a consistent approach to annotating sources. It makes it easier for students to organize their thinking and find specific types of information later, and easier for teachers to review student work since categorization is consistent across all submissions. Annotation keys are particularly useful for complex categorization schemes like Claim-Evidence-Reasoning frameworks.
Outline
Enable Outline: Toggle this on to give students access to the Outline tab, allowing them to create structured outlines for their research and organize their ideas before writing.
Bibliography
Enable Bibliography: Toggle this on to give students access to the Bibliography tab, allowing them to generate formatted citations for their sources.
Citation Style: Select the desired citation style (e.g., MLA, APA) from a dropdown list.
Allow students to choose citation style: This setting determines whether students can set their own citation style or if they must use the style the teacher has selected.
Requirement: Annotated bibliography: If enabled, students must add written annotations to each citation in their bibliography. Annotated bibliographies help students summarize and evaluate their sources.
Requirement: Words per citation annotation: If you've enabled annotated bibliography, you can set a minimum word count for each citation annotation. This ensures students write substantive summaries.
Split the bibliography into primary and secondary sources: Enabling the split bibliography option is helpful for specific projects requiring separate citation sections. Students can specify whether a source is primary or secondary in one of the citation editors.
Requirement: Minimum sources in bibliography: Set a minimum number of sources that must appear in the bibliography. This can be the same as or different from the minimum number of sources in the library. Even if the source requirement is set to 0, the assignment dashboard will display the number of sources added by students, allowing you to track their progress.
To help students create annotated bibliographies, they can edit citations directly from the Bibliography tab or the Sources tab. Students can add notes, summaries, and evaluations to each citation entry.
Documents
Enable Documents: Toggle this on to give students access to the Documents tab, allowing them to work on documents, slides, or sheets connected to their assignment.
Attach document templates: Click Add Document to create or attach templates for students to use. You can attach Google Docs, Google Slides, Google Sheets, Microsoft Word, Microsoft PowerPoint, or Microsoft Excel templates.
When attaching templates, you can either create a new blank document or select an existing file from your Google Drive or Microsoft OneDrive. If you've already created templates with specific formatting, prompts, or structure, select those files to give students a starting point.
Requirement: Word count: Enter a minimum word count for documents (Google Docs or Microsoft Word). This requirement only applies to documents, not slides or sheets. If you want to track student progress without enforcing a minimum, set the word count to zero. This lets students see their word count as they write without blocking submission if they're under the target.
Rese AI Research Assistant
Enable Rese: Toggle this on to give students access to the Rese AI research assistant, an AI-powered tool that helps students with their research and writing process.
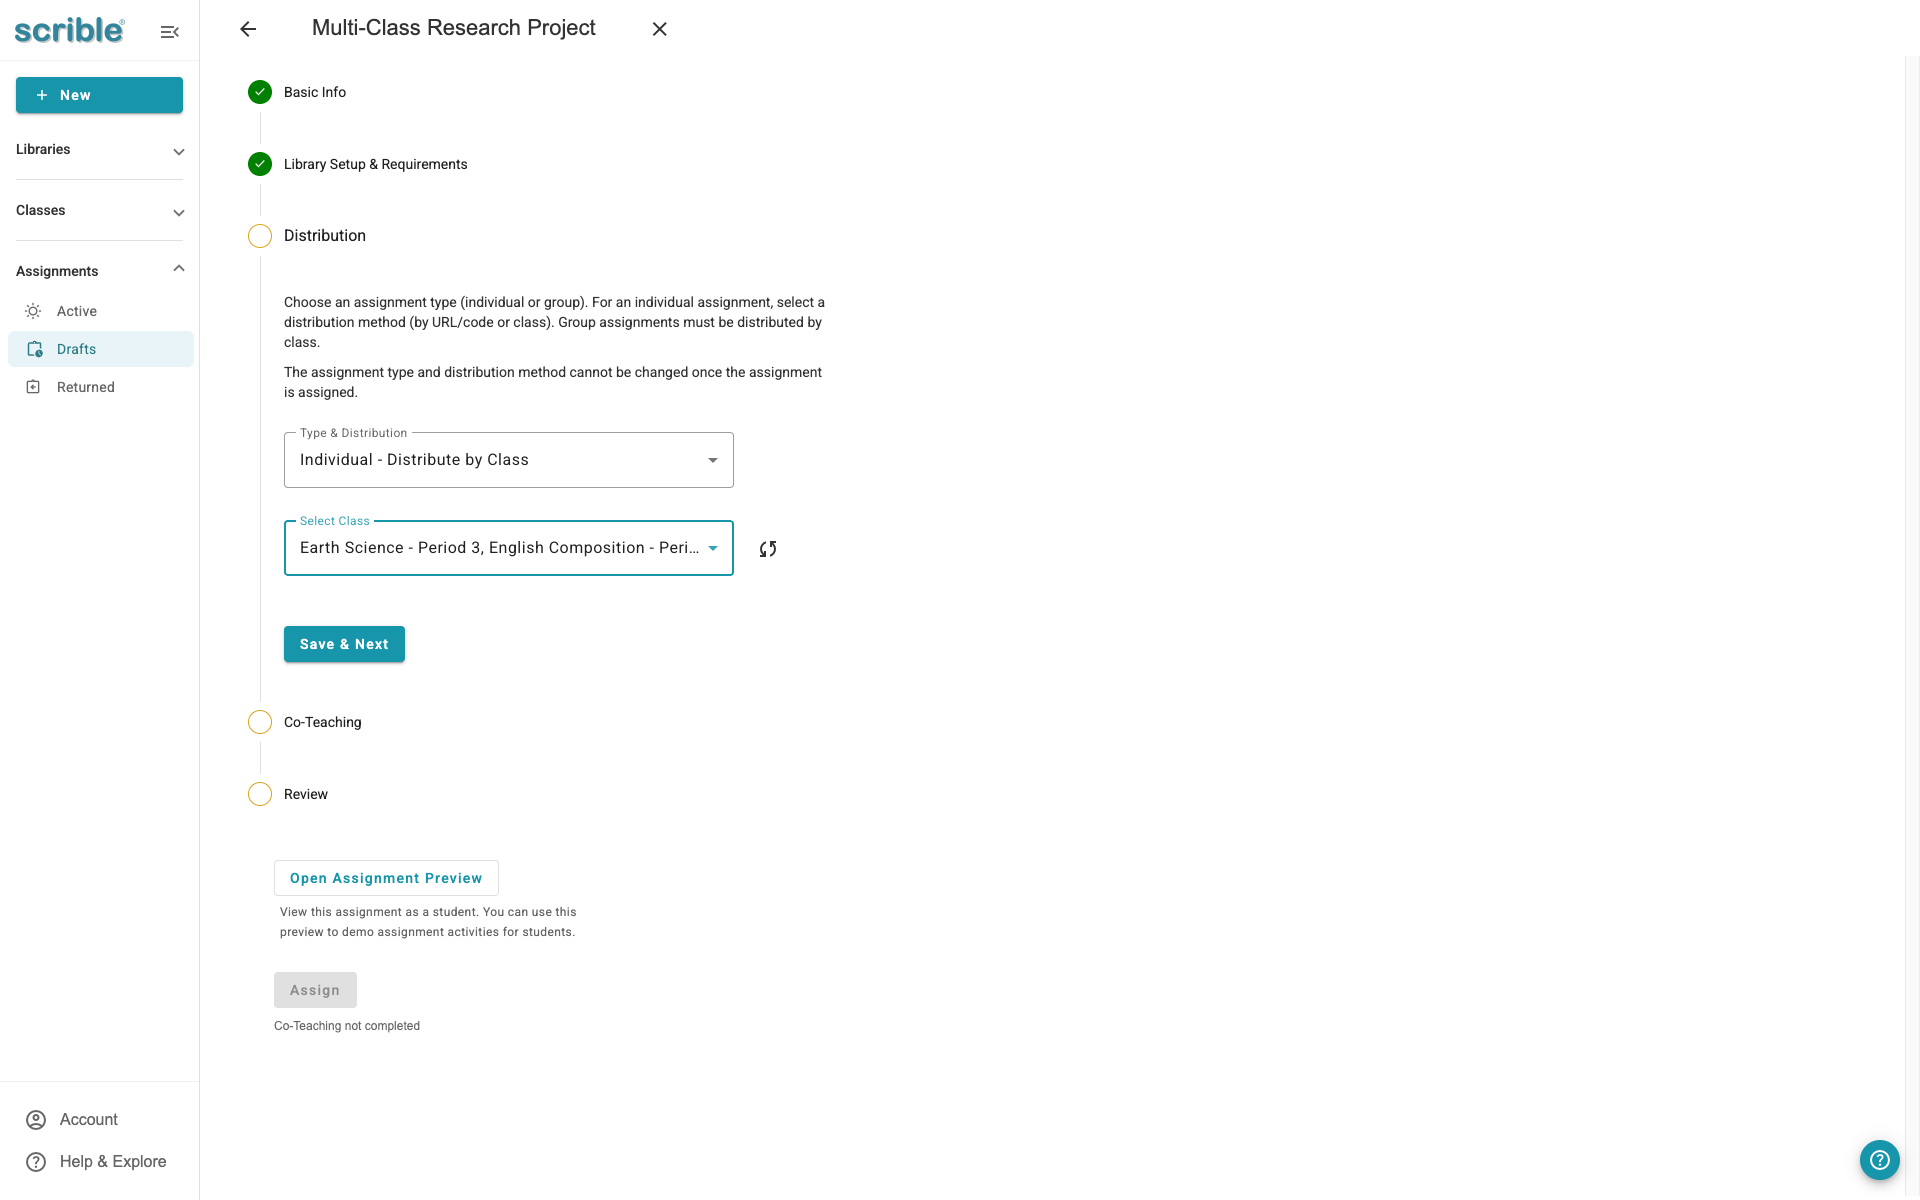
Distribution Options
Choose how students will access the assignment.
Choosing a Distribution Method
Scrible offers three distribution methods for assignments.
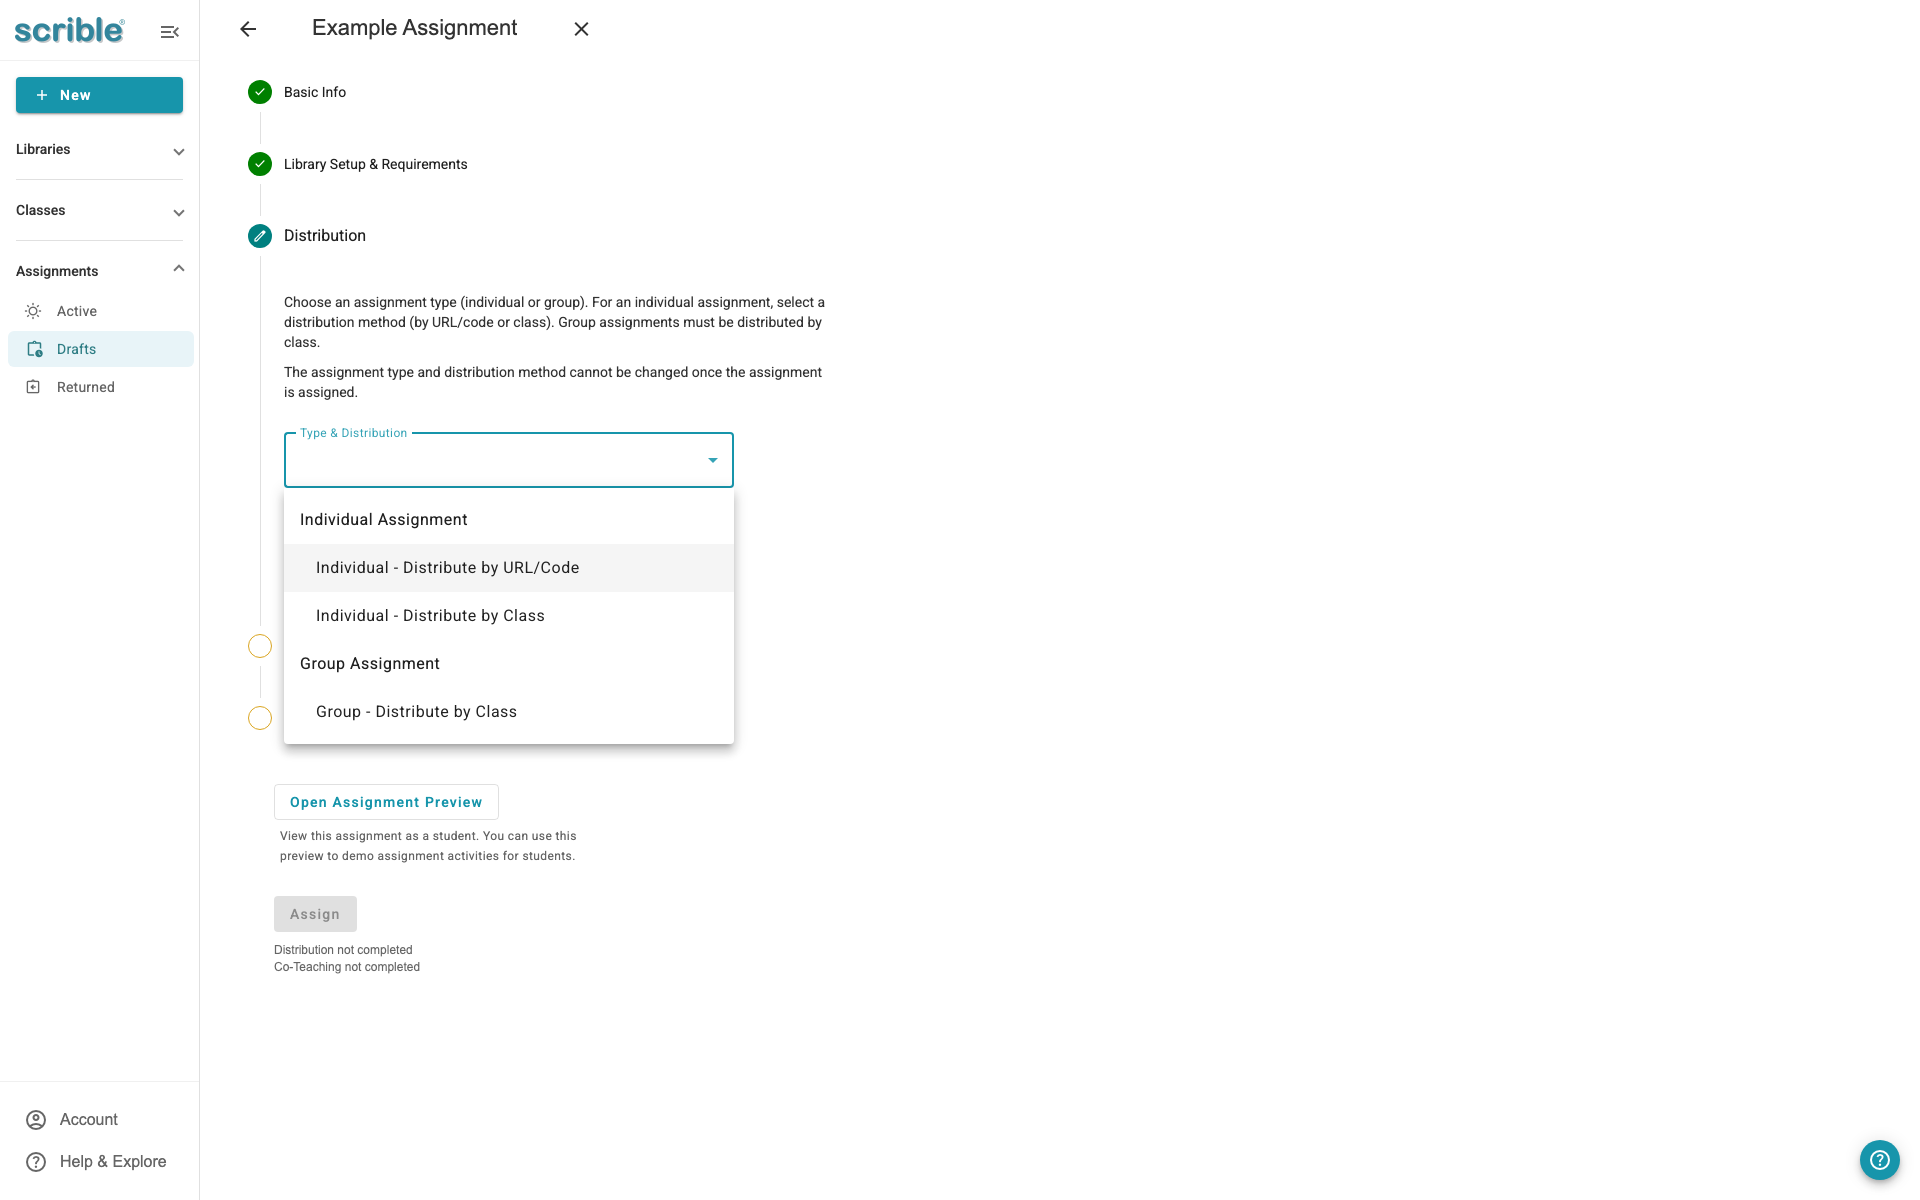
Individual - distribute by URL / Code
This method generates a unique link and access code for the assignment. Students can access the assignment by visiting the URL or entering the code in Scrible.
When to use this method:
Students are not enrolled in Scrible classes
You're using a learning management system (Canvas, Google Classroom, etc.) to share assignment links
You want a simple link to share via email or other platforms
Individual - distribute by Class
This method assigns the assignment to students in pre-configured Scrible classes. Students enrolled in your class will see the assignment automatically in their dashboard.
When to use this method:
You've set up classes in Scrible and enrolled students
You want assignments to appear automatically for students
You're managing multiple classes and want organized assignment distribution
Group - distribute by Class
This method creates group assignments where students collaborate on one shared submission. You configure groups when setting up the assignment, and students work together in their assigned groups.
When to use this method:
Students should collaborate on research and writing
You want one submission per group instead of individual submissions
You're teaching collaborative research skills
Important note about group assignments: Group assignments must be created directly in Scrible, not through Canvas or other learning management systems. To access all group management tools and collaboration features, always create group projects within the Scrible platform.
Distributing to Multiple Classes
When creating a Custom Assignment and using Individual - Distribute by Class, you can select multiple classes in the Distribution step and distribute to all of them at once. This option is only available when creating a Custom Assignment (not Quick Start).
Adding Co-Instructors
In the creation wizard, this step is called Co-Teaching.
If you're team-teaching or collaborating with other educators, you can add co-instructors to your assignment. Co-instructors can view student submissions, provide grades, and give feedback just like the primary instructor.
When to add co-instructors:
Team-taught courses with multiple teachers
Department collaborations across sections
Teaching assistants who help manage assignments
To add a co-instructor, enter their email address in the co-instructor field. They'll receive an invitation to join the assignment.
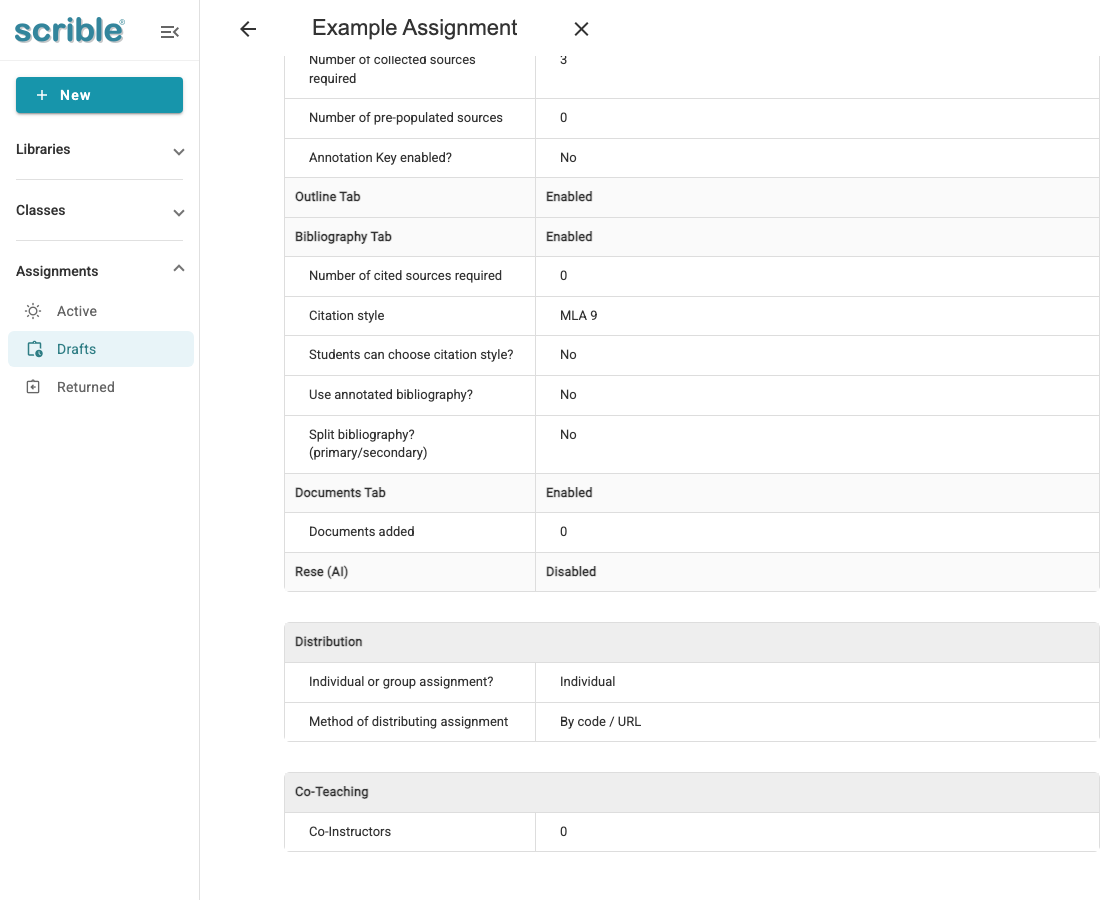
Review and Assign
The final step shows a summary of all your assignment settings. Review the configuration to make sure everything is correct:
Assignment title and dates
Enabled requirements and features
Distribution method
Co-instructors (if any)
Once you've reviewed everything, click Assign to finalize and distribute the assignment. Based on your distribution method, the assignment will now be available to students via URL/code, in their class dashboard, or as a group project.
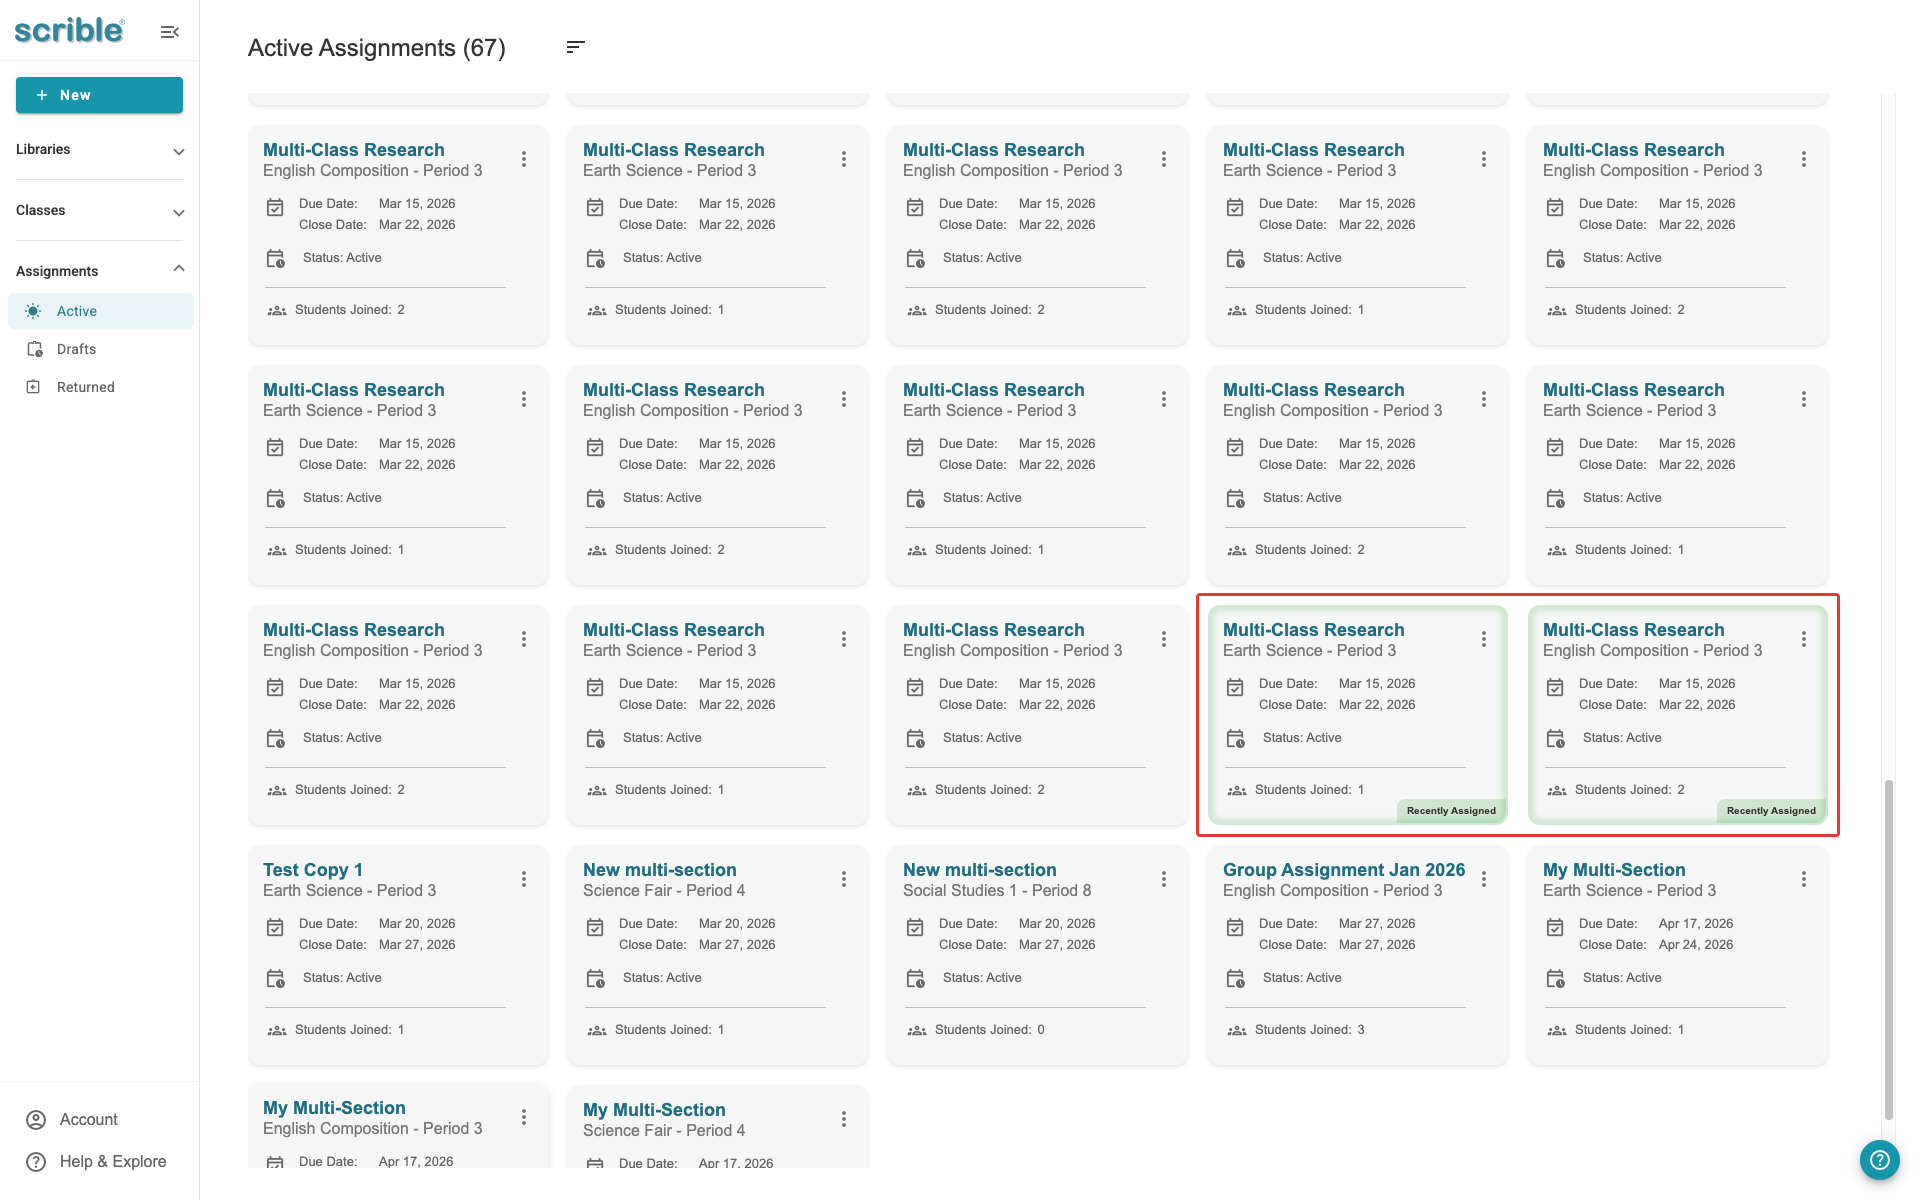
When distributing to multiple classes, clicking Assign returns you to the active assignments page. The newly created assignment cards appear with a green halo, making it easy to identify your new assignments at a glance.
Using Student Preview
After creating your assignment, you can use Student Preview to see exactly how the assignment appears to students. Click the teal Open Student Preview button from the assignment page.
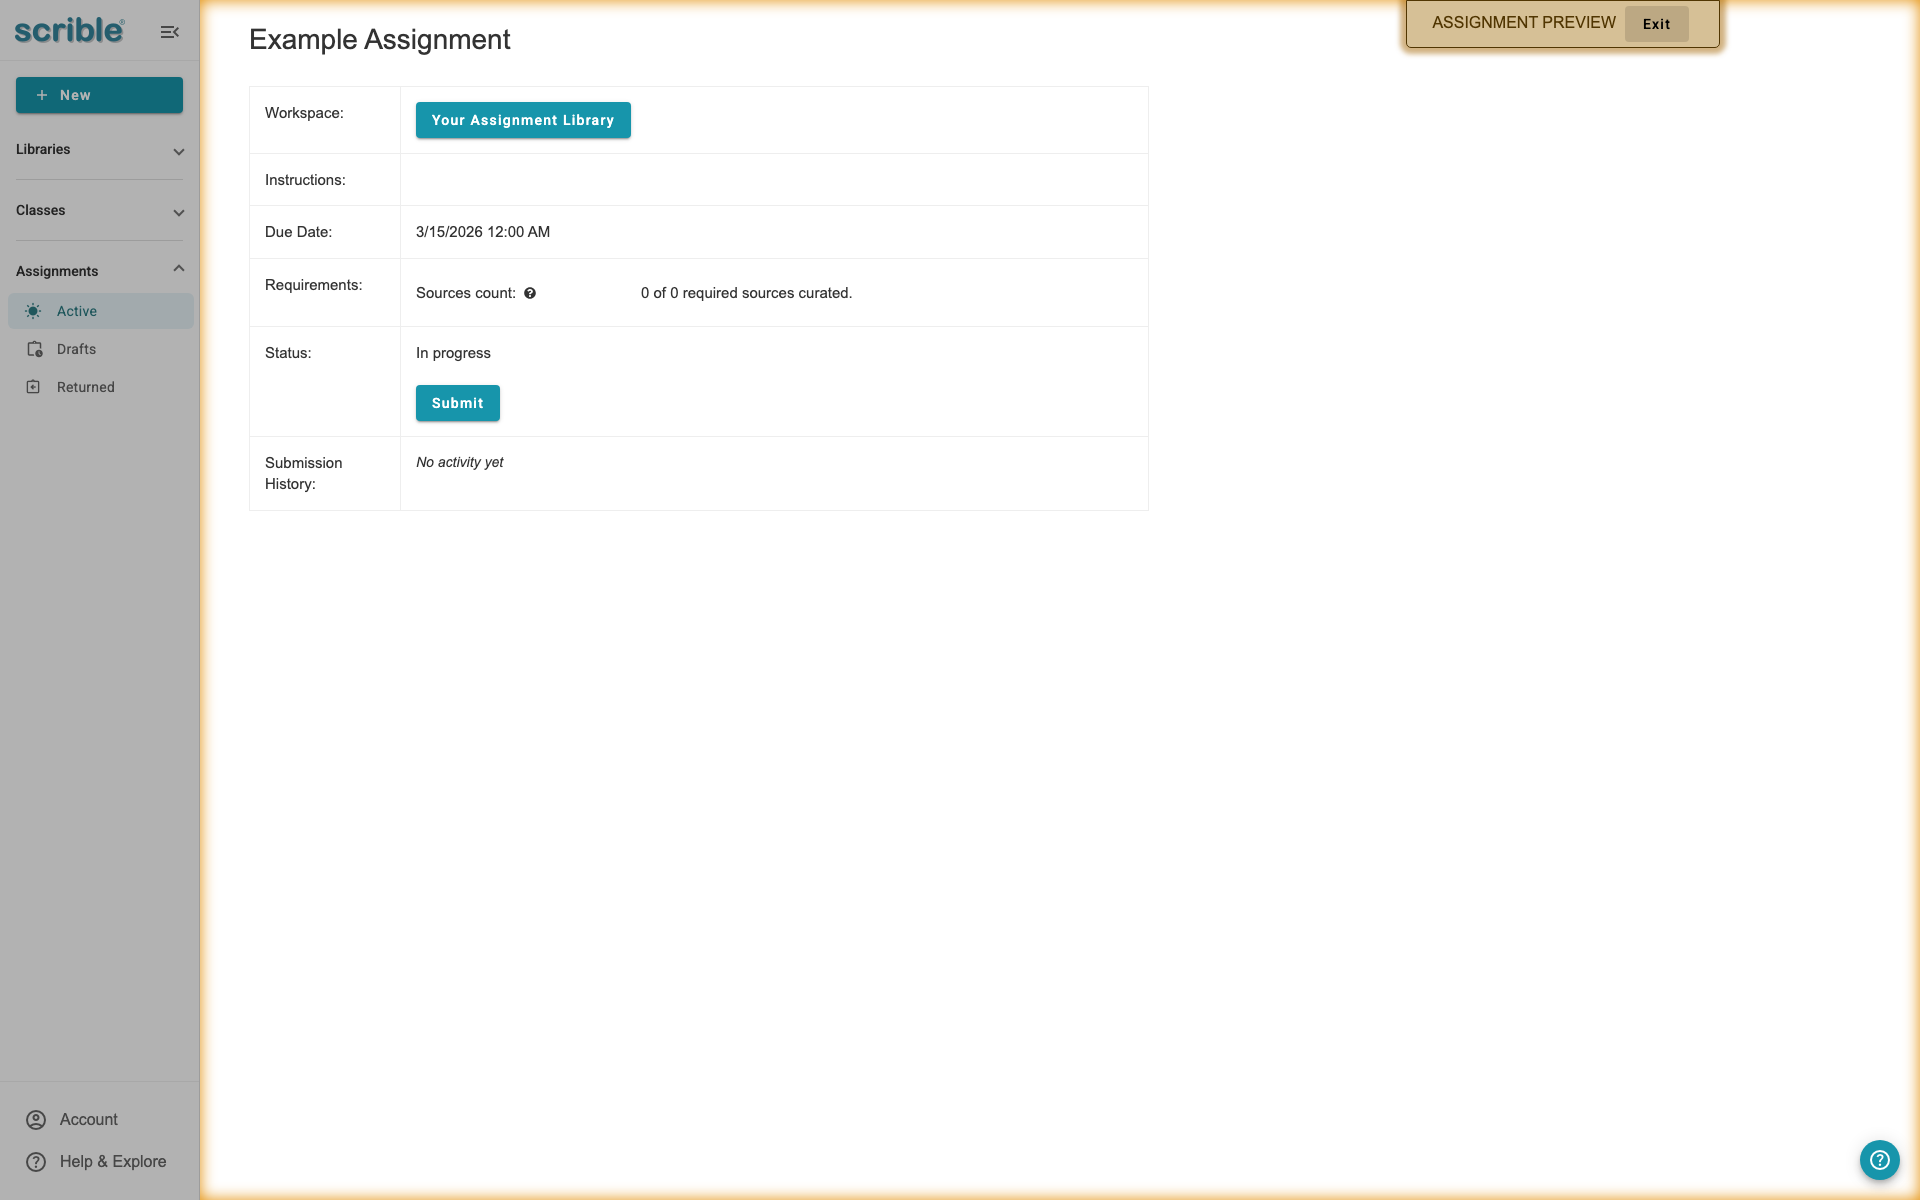
A gold banner indicates you're in Student Preview mode. From here, you can:
View the overview page with requirements and due dates exactly as students will see them
Access the assignment library to interact with all student-facing tabs and features
Review any preloaded resources in the Sources tab
Examine annotation keys via the Key icon or highlighter icon in the annotation toolbar
Check bibliography settings and citation style options
Click Exit in the gold banner to return to teacher view and make adjustments as needed.
Understanding Due Dates and Close Dates
Scrible uses two different deadline types to help you manage assignment workflows.
Due Date
The Due Date is the deadline by which students should complete and submit their work. This date is visible to students and helps them plan their work schedule.
Close Date
The Close Date is the final cutoff after which no changes can be made to the assignment. This date is NOT visible to students. After the close date passes, all student work becomes locked and read-only.
Why Use Both Dates?
Using both dates gives you flexibility:
Grace Period for Late Work: Set the close date after the due date to allow late submissions
Time for Revisions: Students can revise their work based on your feedback up until the close date
Prevent Last-Minute Changes: Once the close date passes, work is locked so students cannot make further edits
Important: Students can submit and un-submit their work multiple times before the close date. Scrible maintains a complete submission history showing when work was submitted and un-submitted.
What Happens After the Close Date?
Work Becomes Locked
Once the close date passes, all student work is locked as read-only, regardless of whether it was submitted. Students cannot:
Submit work
Un-submit work
Make any edits or changes
Extending Deadlines
If you need to give students more time, you can extend the deadline by editing the assignment and updating the close date. This will unlock the assignment and allow students to continue working.
Viewing Submission History
You can always view the complete submission history for any assignment, showing:
When work was submitted
When work was un-submitted (if applicable)
The current submission status
Tips
Start simple: If this is your first assignment in Scrible, enable only one or two features to get familiar with the platform. You can always create more complex assignments later.
Test with a sample assignment: Before creating assignments for students, make a test assignment to explore all the features and see how they work together.
Due date vs. Close date: Set the close date 2-3 days after the due date to allow late submissions while still having a firm deadline. This gives students flexibility without keeping assignments open indefinitely.
Word count flexibility: If you want to track student writing progress without enforcing a strict minimum, set the Documents word count to zero. Students will still see their word count as they write.
Group assignments: Always create group projects directly in Scrible rather than through your learning management system. This ensures you and your students have access to all collaboration and group management features.
Student Preview as a teaching tool: Use Student Preview to demonstrate assignment navigation to students. Have them follow along as you show the overview page, assignment library, and library tabs.
Frequently Asked Questions
"Do students see the close date?" No, only the due date is visible to students. The close date is only visible to instructors.
Troubleshooting
"I can't update the assignment": Once a close date has passed, the assignment becomes locked. You'll need to set a new close date in the future to unlock the assignment.
"Students say they can't submit": Check if the close date has already passed. If so, update it to a future date.